
Contents
Multiple options for creating, assigning, and viewing departments are available in each version of TimeClick. The version you are running makes a difference in how you set up departments and your options for displaying them.
Before moving forward, double-check your version by going to Help >> About TimeClick in the upper left corner of the main screen. The Legacy versions (any version beginning with LE or version 10) will have very similar steps while versions TimeClick 18 or 19 are different. TimeClick 20 has some new features available regarding department heads and their function.
TimeClick 2020
Create Departments
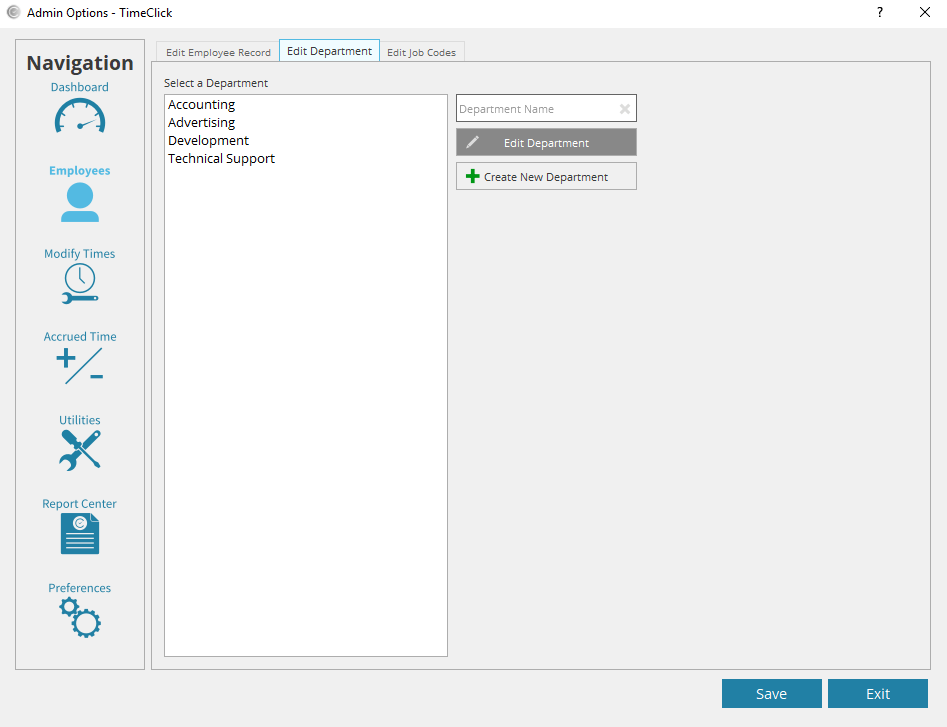
To create a new department
- Enter Admin in the top right of the main screen and type in your password
- Select Employees in the left Navigation
- Click the Edit Department tab along the top
- Select Create New Department
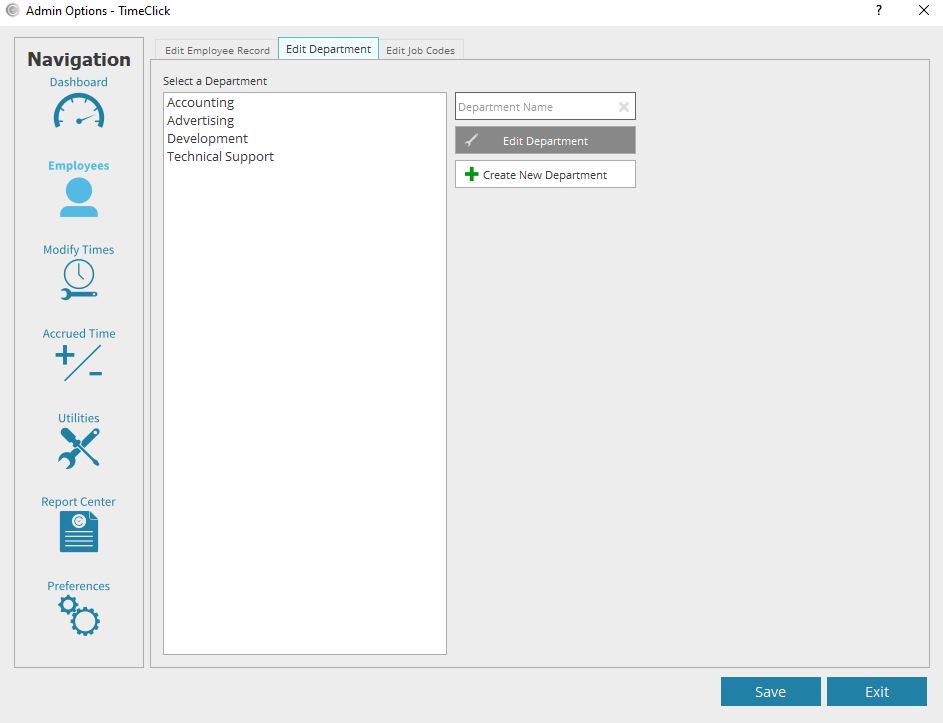
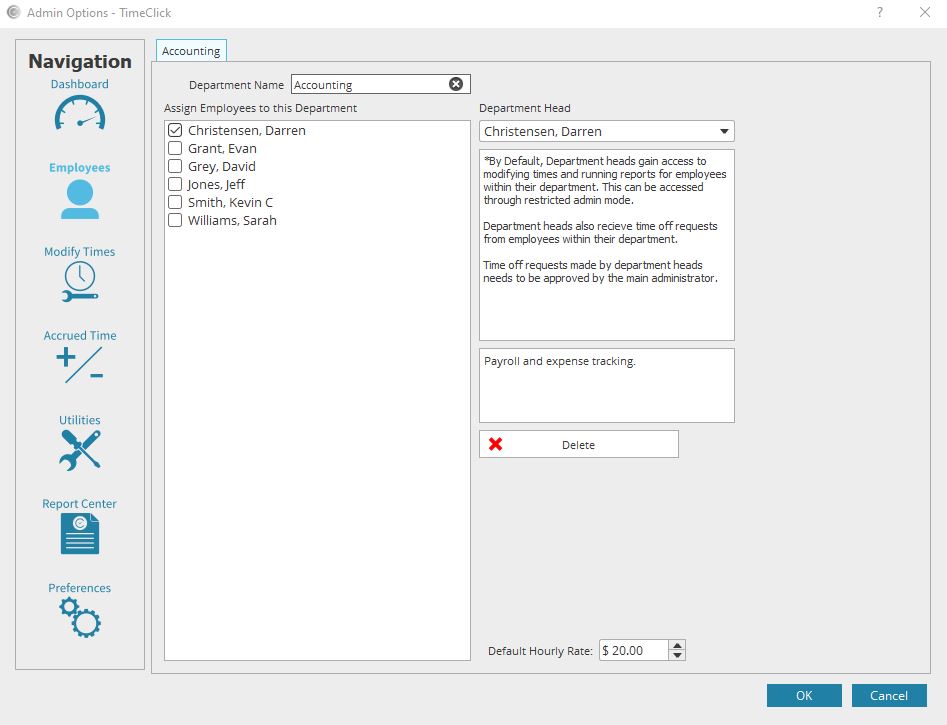
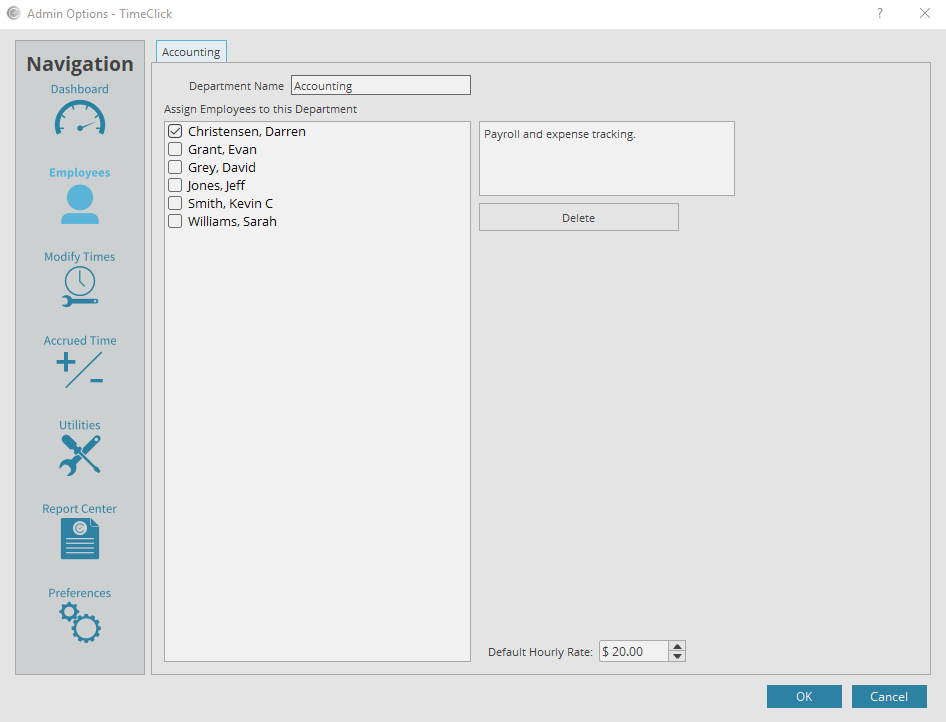
In this window, fill out the department name and select which employees belong to that department. This will allow them to clock in and out of that department and any others they are assigned to. If needed or wanted, fill out a department description to the right or select a department head. Click OK to save your work and go back to the Departments window. Add any other departments you have while you’re here.
Edit Departments
To edit the department name, description, department head, and employees assigned, go back to Admin >> Employees >> Edit Department. Select the department in need of editing and select Edit Department. Here, make any adjustments that fit your fancy and click OK again to save.
Another option for changing employee assignments is to change it directly in an employee’s record. Let’s say an employee just moved into a new department. You’ll enter Admin >> Employees >> Edit Employee Record. Select the employee’s name and Edit Employee Record (or just double-click on their name). On their record, you will see the departments they are currently assigned to as shown in the image below.
Click the button Assign to Department(s) to select another department or assign/remove the assignment from this employee. Click OK to save the change.
Department Reports
Assigning employees to departments helps managers stay organized and run clean focused reports. There are a couple different ways you can view an employee’s department hours.
- Hours Report: When an employee is assigned to two or more departments and are clocking in/out of them weekly, you will see all their department totals on their individual Hours Report.
- Department Report: this report shows just department totals. Each department lists all employees that belong to that department along with their total hours working under that department name. If an employee clocks in and out of multiple departments, you will see their totals on multiple pages, one for each department.
Change TimeClick Display to Show Only One Department
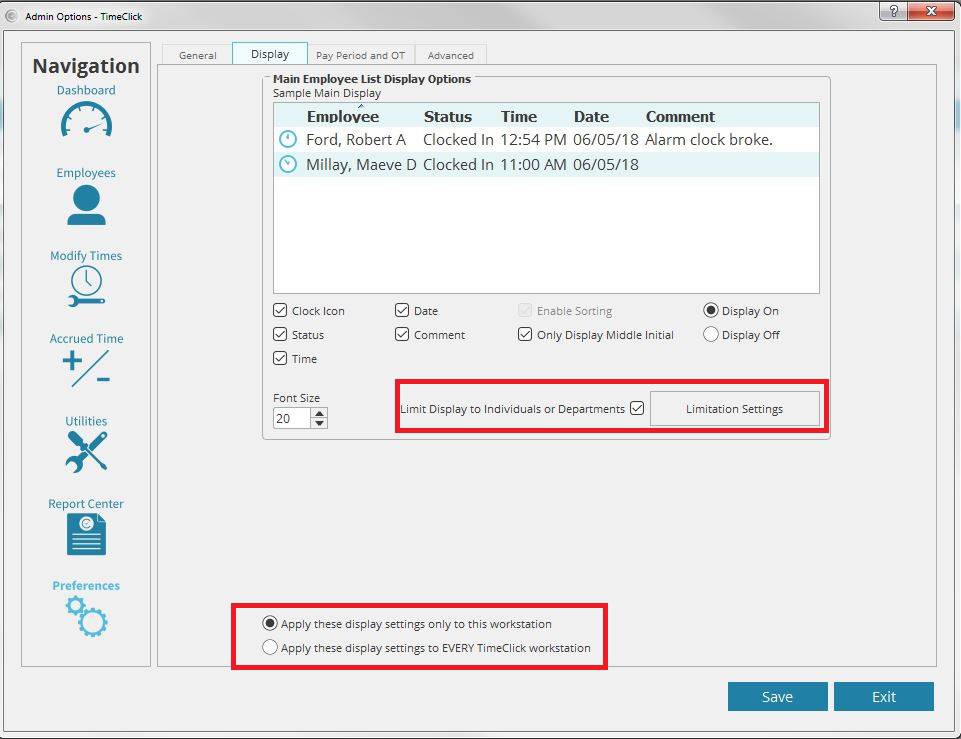
For larger companies, having a single department display on a particular computer. For example, a company might have one or two computers for the warehouse personnel to clock in with and another computer for the customer support reps but they don’t want the names of both departments showing on all computers. To change the display
- Enter Admin mode on the workstation you are altering
- Go to Preferences
- Click the Display tab
- Mark the box “Limit Display to Individuals or Departments”
- Select the department you want to display on this workstation and click OK
- Mark the bubble next to “Apply these display settings only to this workstation”
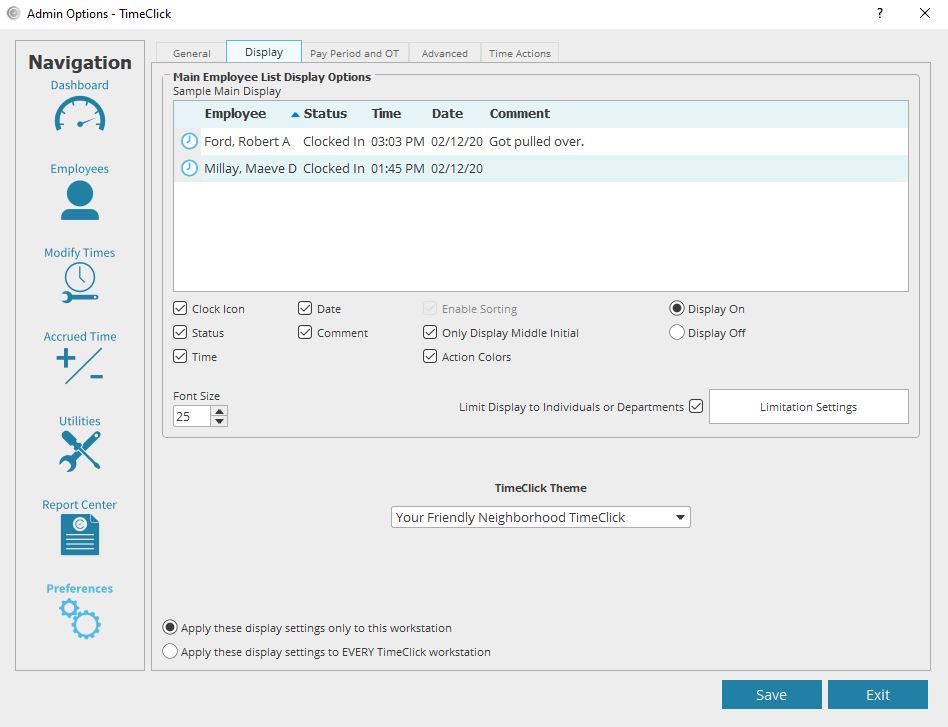
This same process can be used for limiting the display to only certain employees if needed.
Department Heads
Through TimeClick 20, department heads are better able to manage their teams with the Department Head feature. You can assign these department heads by going into the employee section of the admin options. Then select Edit Departments, and click on a department name. On the top right, you see an option to select a department head.
Department heads can modify times and run reports for employees within their department. This can be accessed through restricted admin mode. They can also receive and approve time off requests from employees within their department. Time off requests made by department heads must be approved by the main administrator.
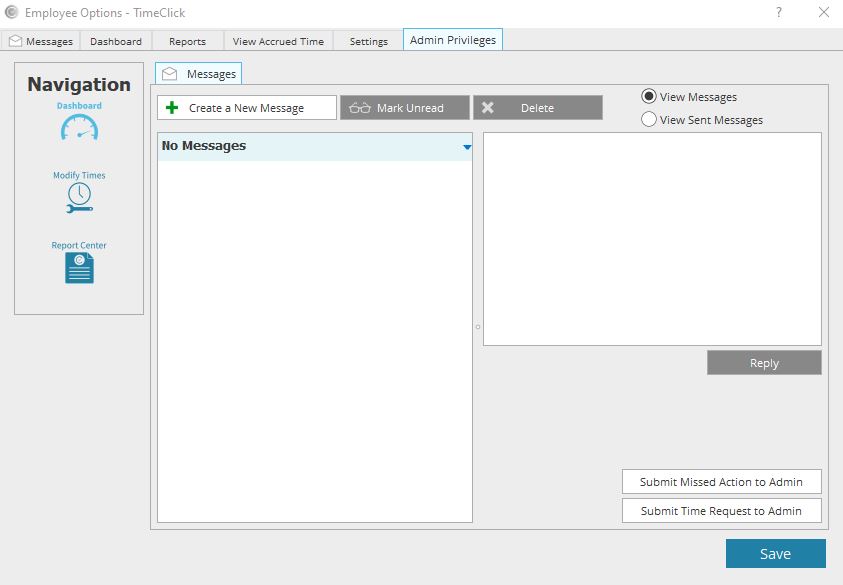
For department heads to access their restricted admin settings, they will
- Double-click on their name on the main TimeClick screen
- Enter their password
- Select Launch Employee Options
- Click the Admin Privileges tab and Launch Restricted Admin Mode
TimeClick 2018 and 2019
Create Departments
To create a new department
- Enter Admin in the top right of the main screen and type in your password
- Select Employees in the left Navigation
- Click the Edit Department tab along the top
- Select Create New Department
In this window, fill out the department name and select which employees belong to that department. This will allow them to clock in and out of that department and any others they are assigned to. If needed or wanted, fill out a department description to the right. Click OK to save your work and go back to the Departments window. Add any other departments you have while you’re here.
Edit Departments
To edit the department name, description, and assignees go back to Admin >> Employees >> Edit Department. Select the department in need of editing and select Edit Department. Here, make any adjustments that fit your fancy and click OK again to save.
Another option for changing employee assignments is to change it directly in an employee’s record. Let’s say an employee just moved into a new department. You’ll enter Admin >> Employees >> Edit Employee Record. Select the employee’s name and Edit Employee Record (or just double-click on their name). On their record, you will see the departments they are currently assigned to as shown in the image below.
Click the button Assign to Department(s) to select another department or assign/remove the assignment from this employee. Click OK to save the change.
Department Reports
Assigning employees to departments helps managers stay organized and run clean focused reports. There are a couple different ways you can view an employee’s department hours.
- Hours Report: when an employee is assigned to two or more departments and are clocking in/out of them weekly, you will see all their department totals on their individual Hours Report.
- Department Report: this report shows just department totals. Each department lists all employees that belong to that department along with their total hours working under that department name. If an employee clocks in and out of multiple departments, you will see their totals on multiple pages, one for each department.
Change TimeClick Display to Only Show One Department
For larger companies, having a single department display on a particular computer. For example, a company might have one or two computers for the warehouse personnel to clock in with and another computer for the customer support reps but they don’t want the names of both departments showing on all computers. To change the display
- Enter Admin mode on the workstation you are altering
- Go to Preferences
- Click the Display tab
- Mark the box “Limit Display to Individuals or Departments”
- Select the department you want to display on this workstation and click OK
- Mark the bubble next to “Apply these display settings only to this workstation”
This same process can be used for limiting the display to only certain employees if needed.
Assign Managers to Departments
If you have certain employees who need to run reports, modify times, etc. for a department you can give them that capability. We do have a video tutorial on this process as well which you can find here or just follow the written steps here.
- Enter Admin
- Navigate to Employees
- Select the manager’s name
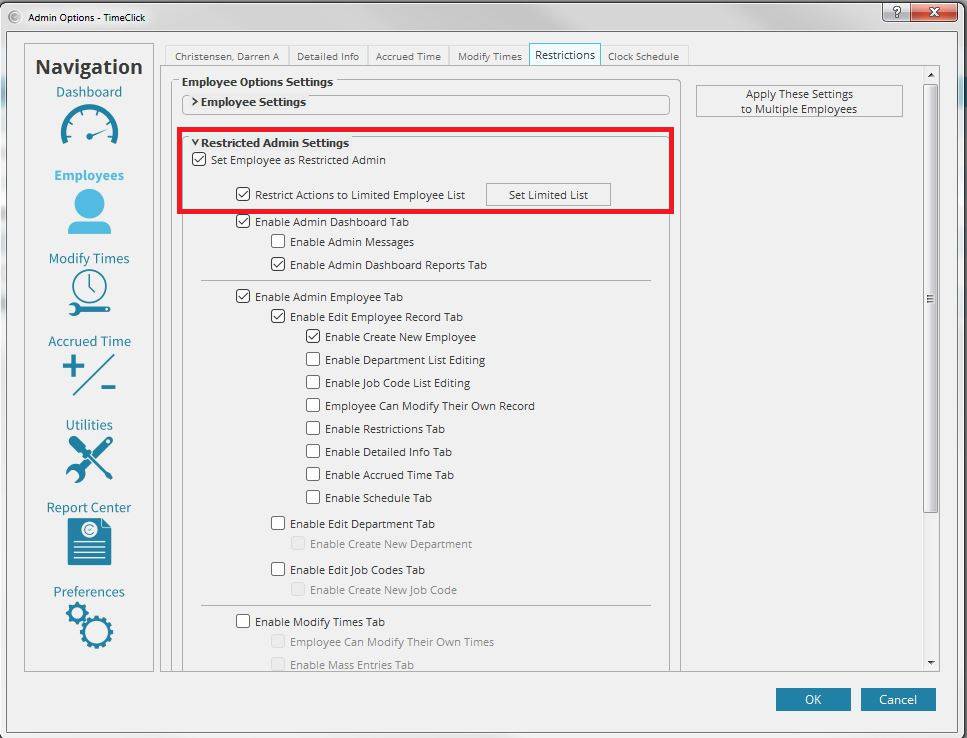
- Click the Restrictions tab at the top of the window
- Mark the box next to “Set Employee as Restricted Admin” near the bottom of the window (or minimize the Employee Settings at the top to bring the Restricted Admin option higher)
With that box marked, several options will appear. By clicking “Restrict Actions to Limited Employee List” you can choose the department that manager has jurisdiction over, or can do the needed actions you assign them. These options for the restricted admin, or manager, can be changed at any point in time and can vary depending on the manager
For managers to access their restricted admin settings, they will
- Double-click on their name on the main TimeClick screen
- Enter their password
- Select Launch Employee Options
- Click the Admin Privileges tab and Launch Restricted Admin Mode
From here they can do whatever they need to do for managing their employees.
Versions 10, LE, SP1, 12, and 16
The steps for department setup is essentially the same in each of these legacy TimeClick versions. This video shows the steps for creating and assigning departments using version 10 but they are applicable to LE 16 too.
Create Departments
- Enter Administration Mode in the top left corner of the screen
- Select Department
- Click Add New Department
- Type the department name and click OK
- Assign a supervisor by clicking the square icon to the right and choosing an employee name
- Type a description if needed
- Click Finished
Edit Department
To edit the department name or supervisor, enter Administration Mode >> Department. If just changing the name or supervisor, click Change Department Name. To edit the department description, delete the department, and/or re-assign the supervisor click Edit Department.
Assign Employees to Department
To assign an employee to a department, enter Administration Mode>>Employees>>Edit Employee Record>>Select the employee. In the middle of that window there is a field labeled Department No. Click the icon next to this field to bring up a window with the list of departments with their numbers (the department number is automatically assigned in the order that the departments were created) where you can select the department the employee belongs to.
Department Managers
A department manager can run reports and modify times (if given that option). An administrator can change the restrictions on a department manager in Administration Mode>>Preferences>>Password & Misc. controls. There will be a box on the right side of the window saying “Level 2 & Dept. Heads Can Modify Times.”
Department supervisors enter supervisor mode by clicking the Administration tab at the top of the main TimeClick screen and select the third item on the list “Department Supervisor.” They then select the department they are in charge of and type in their password, which is their regular employee password. If a manager needs access to everyone in the system, they only need to be given the Level 2 administrative password. They will go to the Administration tab >> Restricted Administration Level 2 and type in the Level 2 password the primary administrator sets.
Change Department Displays
To have one department at a time listed on the main screen, look at the top of the main screen next to the TimeClick logo. The first in the row of options is Departments. Click on this and select a department. The change in the main interface should immediately follow. To have all departments showing open the Department window again found on the main screen and select “Display All Departments.”
To have one workstation default to display only one department right-click on the TimeClick icon and select Properties. In the text field next to Target there will be a file pathway. At the end of the pathway after the last quotation mark, enter a space and the department number you want to always display on this computer. Select Apply then OK and open TimeClick.